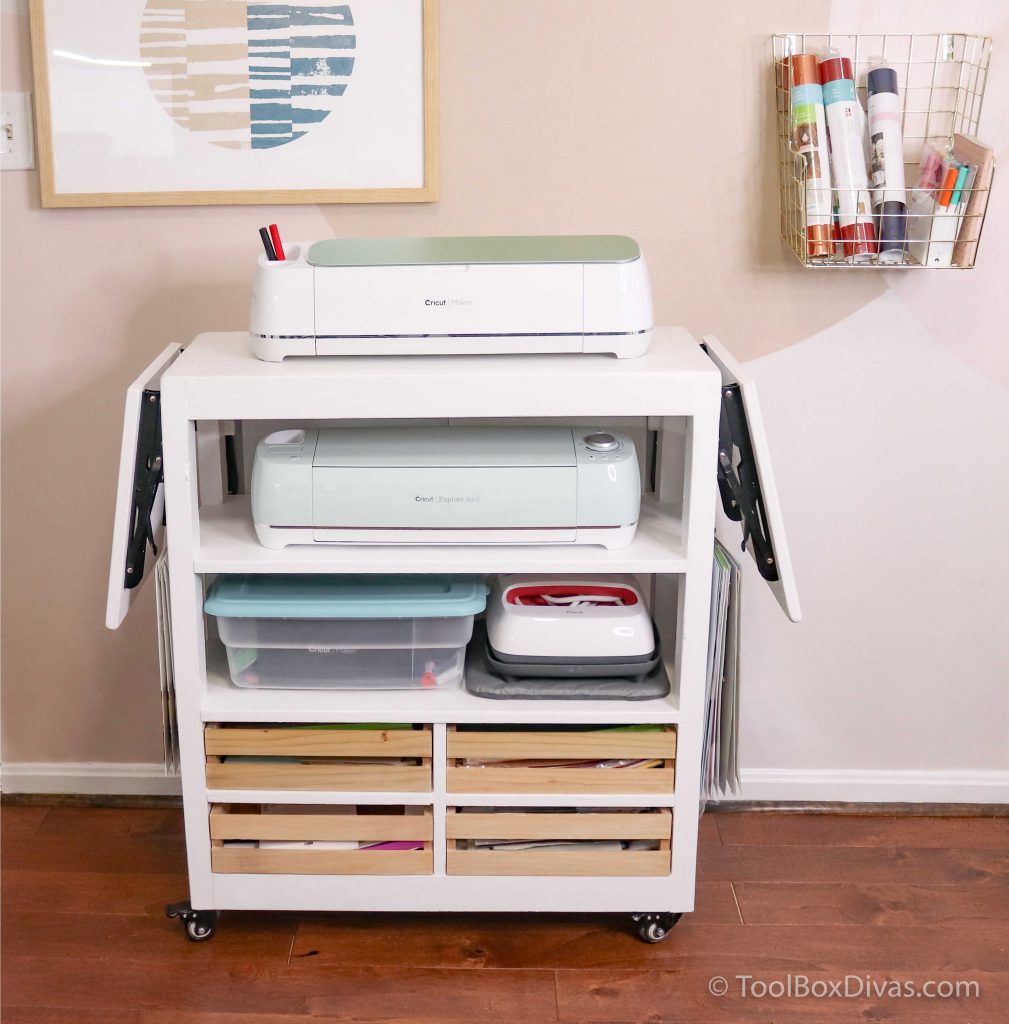
How to Make a DIY Rolling Cricut Craft Cart
This DIY Rolling Cricut Craft Cart is sponsored by Kreg Tool. All opinions are 100% mine.
I was desperately in need of a dedicated spot to store and organize my Cricut and craft supplies. The options I found online were flimsy and expensive. Also, it didn’t fit exactly what I needed. So I designed this mobile craft cart to fit all my craft storage needs. It can be built with limited tools with the assistance of a Kreg Rip-Cut™ and a Kreg Pocket-Hole Jig®.
GET THE PLANS
Materials
- 3 – Lumber 2in. X 3in. X 8ft
- 1 – 48″ x 96 Sheet of 3/4″ Plywood
- 6 – Folding Shelf Brackets 12″
- 4 – 2″ swivel caster
- #8 Woodscrew 1 1/4″
- 40 #8 FH Woodscrew for Pocket Holes 2″
- #8 Woodscrew 1-1/2″
- Wood Glue
Tools
- Miter Saw
- Circular Saw
- Impact Driver
- Tape Measure
- Speed Square
- Level
- Clamps
- Jigsaw
- Brad Nailer (optional)
- Planer (optional)
- Router (optional)
Kreg Tools
- Kreg Pocket-Hole Jig® K5 – My go-to joinery in woodworking is pocket holes. It’s quick, easy, and secure. Using pocket holes make building some of the most complex builds possible. And the Kreg Pocket-Hole Jig® K5 is what I use.
- Kreg Rip-Cut™ – It makes it possible for me to cut down large sheets of plywood without the need for a table saw. It’s great on the go and in a small workshop. Also, I can easily make repetitive cuts without having to remeasure everything out. Kreg Rip-Cut™, along with the K5, is one of the most utilized tools in my workshop.
Watch The Video!
OK, Let’s Get Dirty!
The frame of the craft cart.
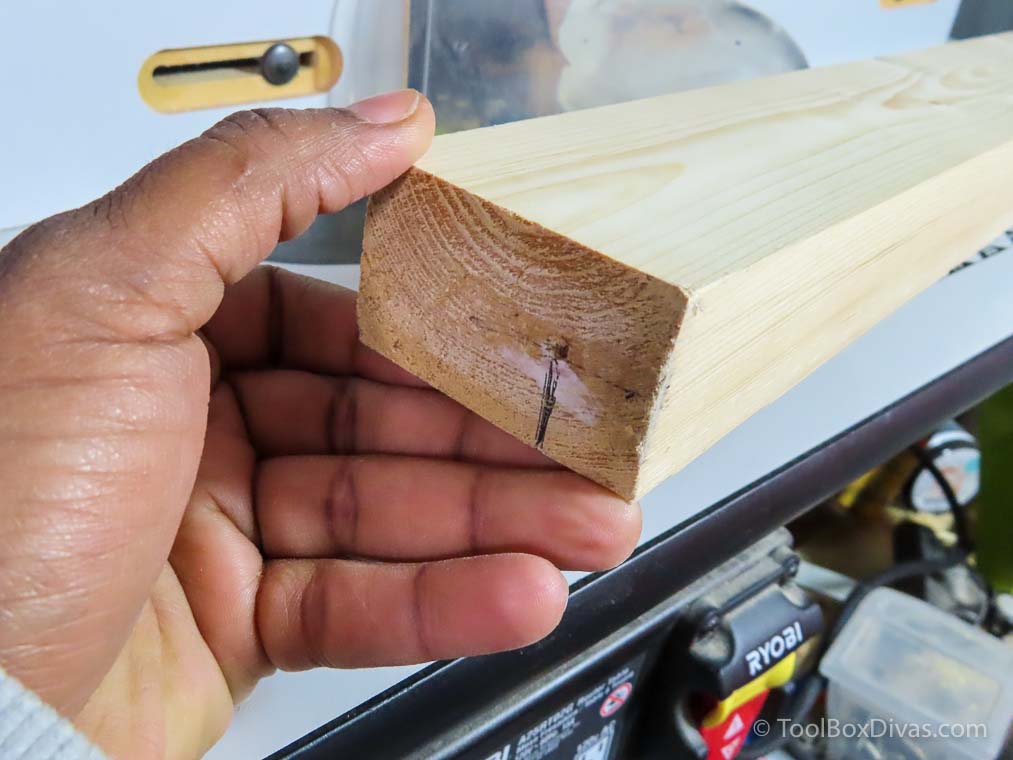
Step 1. I start by cutting the 2×3 lumber for the frame of the craft cart down to size.

Then I take it over to the planer to clean up the boards. Planing the 2x3s is completely optional. I do this because 2×3 lumber is notorious for being all out of shape. But it’s super cheap and sturdy.

Step 2. Using the Kreg Pocket-Hole Jig® K5 create pocket holes in the 2×3 to secure the pieces of the frame of the craft cart.


Step 3. Assemble the two sides of the frame. Clamp the pieces together to make screwing the pocket holes in place easier. I recommend using a speed square to ensure everything is square.


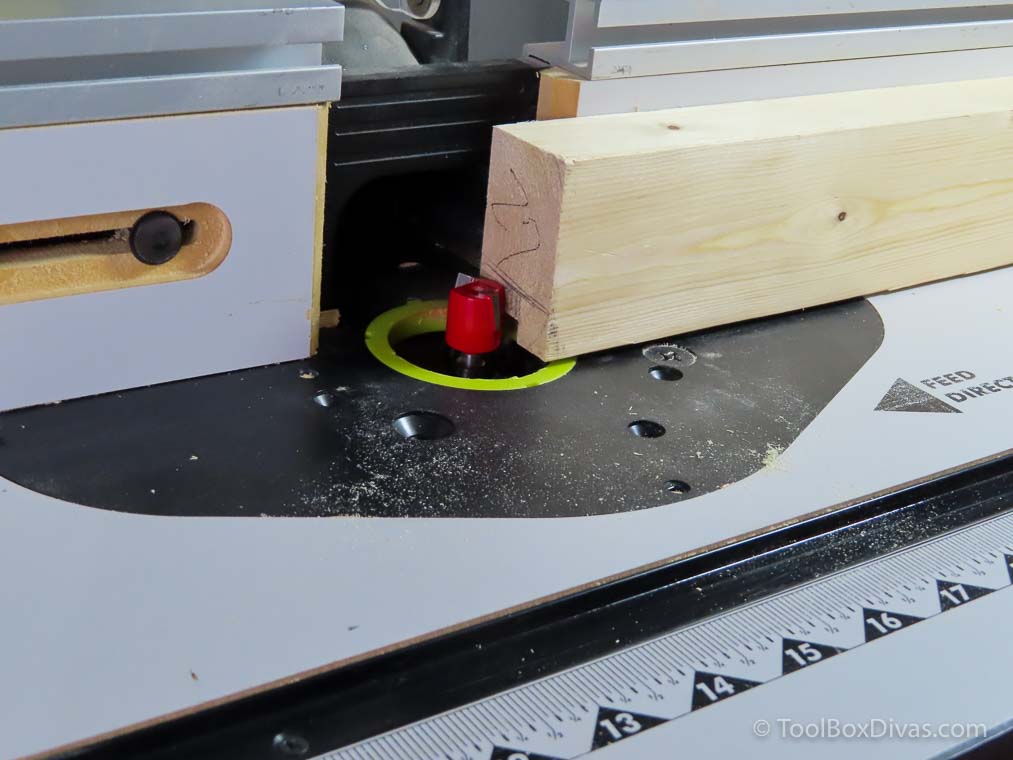
Step 4. Using a router and a 3/4in straight bit route down 3/4″ deep and 1/2″ over in the interior side of the 2×3 top and bottom back and front rails. This is optional so that the bottom and top shelf sit flush in the frame. But you do not have to do this step. The top and bottom shelves can sit on top of the frame. If you do use a router opt for a router with a router table for better control and stability over the cut.
Step 5. Attach the front and back top and bottom rails connecting the two side frames of the craft cart.


The shelves of the craft cart.
Step 6. Using the Kreg Rip-Cut™ and a circular saw cut down the plywood to size length-wise.


Smaller cross cuts can be made using a miter saw.

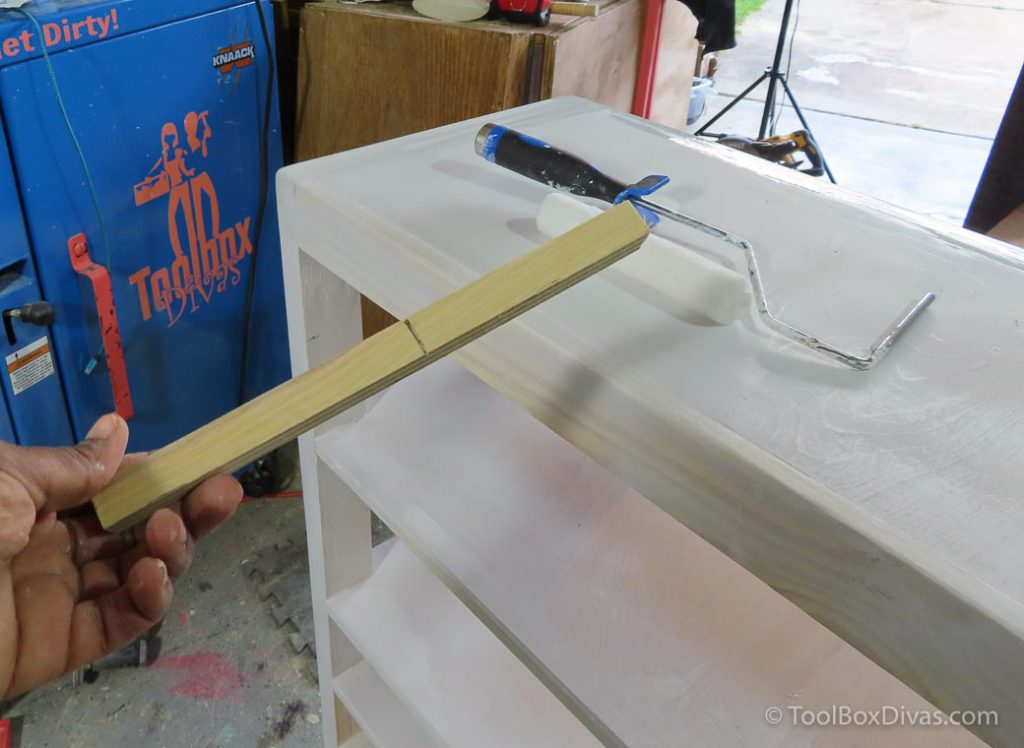
Step 7. Secure the top and bottom shelf with wood glue and screws or a brad nailer.


Step 8: Place pocket holes in the center divider board and screw it in place 13 1/8 ” away from the edge in the middle of the bottom shelf.

I found a speed square especially helpful at this part to ensure everything was square as I screwed it in place.

Step 9. Next screw in place two smaller bottom shelves. I found that it was a lot easier cutting 4 scrap pieces of 2×3 to 4 9/16 in. to get the right height to screw the boards in place.


Step 10. Then using a jigsaw I cut the corners of the 2nd shelf and screwed it in place.


Step 11. Secure the side panel to the sides of the craft cart.

Step 12. Screw the caster wheels in place. It helps to add an additional scrap piece to the bottom so that you’ll have 4 corners to screw the caster into.

Step 13. Attach a piece of scrap wood to the inner corners of the back of the cart. This is where you will attach the folding shelf brackets.

Step 14. Attach the shelf bracket for the back and side folding panels.

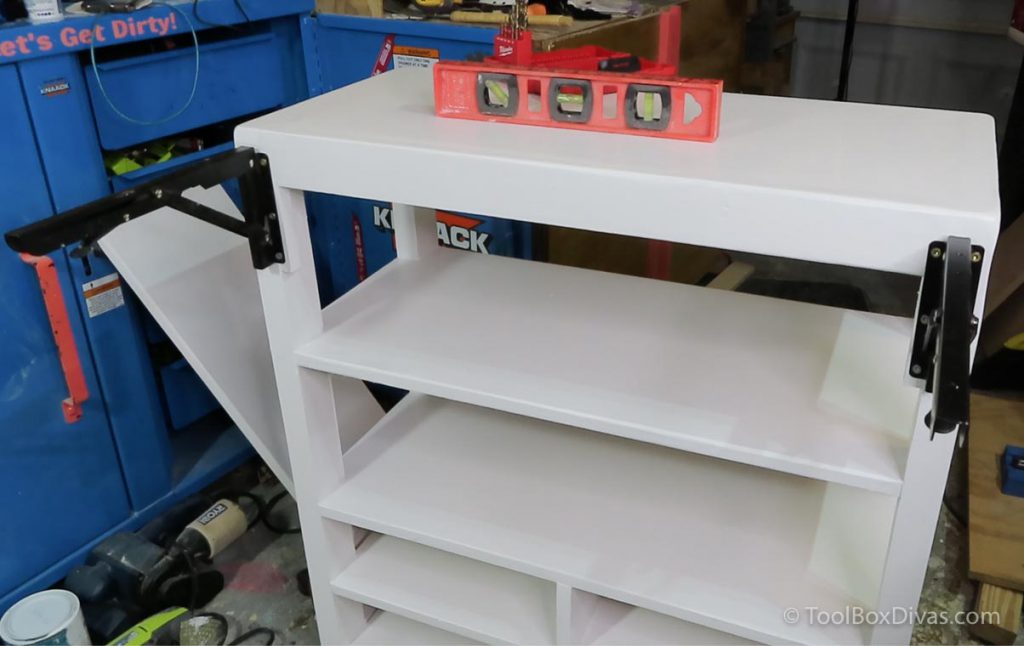
Then secure the panels to the brackets. Ensure that the panels are level with the craft cart when unfolded.

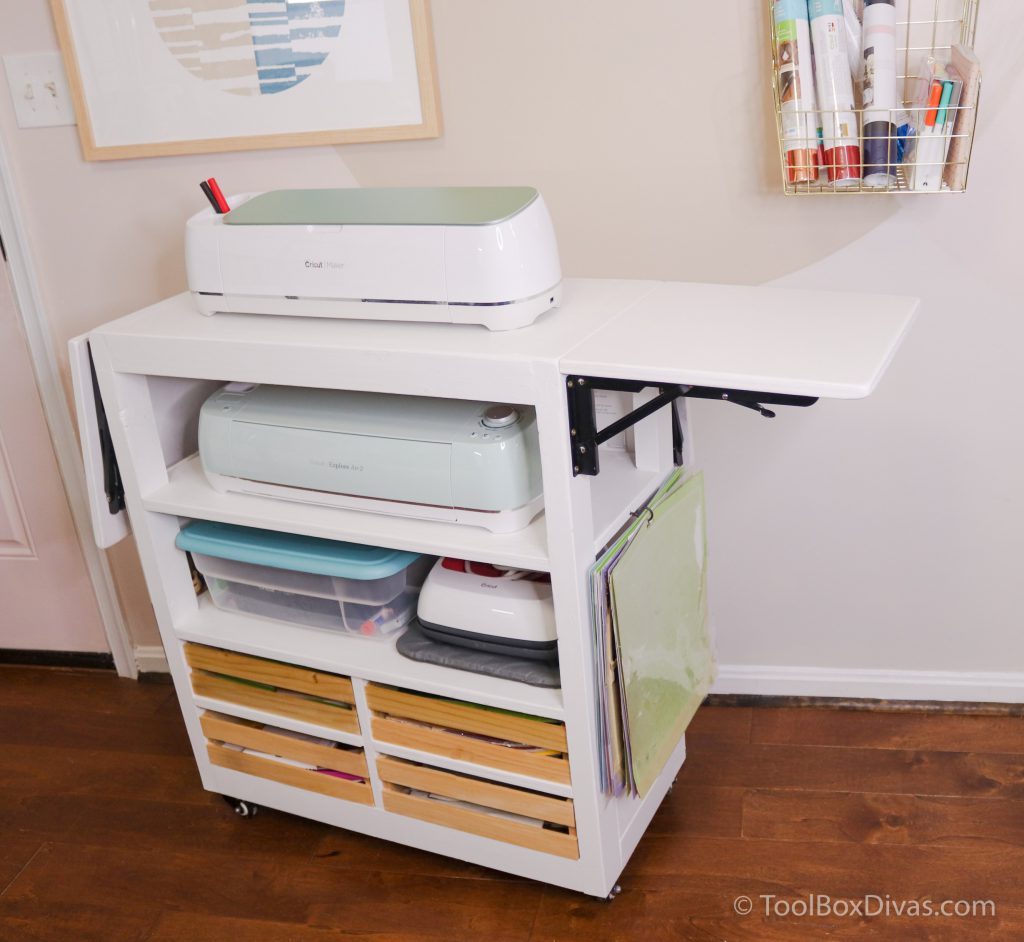
Now store your Cricut and all your Cricut supplies.
I added these custom crates to the front because my supplies just hanging out looked kind of ugly and untidy. You can do the same or find baskets that work within the space.


I absolutely love how this instantly provided some order to the chaos of my craft supplies. I added some J-hooks to the sides and back under the folding panel to hang my Cricut mats and veneer sheets. The back I’m able to hang the long 12x 24 Cricut mats.


GET THE PLANS
For more projects, you can create using the Kreg Rip-Cut™ and a Kreg Pocket-Hole Jig® check out How to Make a Modern Shoe Cabinet and this Desk and Bench Set w/Toy Box Storage.


I love the cart you built for your Cricut. You make everything look so easy. I love crafting and my space is a mess too. 😆 Both my parents passed, my dad in November and my mom 10 days later in December at 96. My siblings and I were there caregivers.. I have been crafting more since they passed as craft therapy. I have more time now and need to get organized. Thank you for sharing your video and design.
Hi Lynne, I’m so sorry to hear about your parents. I know it is never an easy thing to go through, being a caregiver and going through their loss. Thank you so much, I’m so glad you like this build and I’m able to provide some inspiration. Please let me know if you have any questions about what I did.
About how much was this to make? I know with cost of lumber going up it’s going to be expensive but I was a bit surprised to see the material list be over $250. Thank you!
That is an excellent question. I made this before the costs started going up. My hopes are lumber costs will start to go back down VERY soon for all of our sake. It’s seriously ridiculous.
This is amazing!!! Do you have an estimate on the material cost for this project?
Thank you so much! I honestly don’t have an estimate given the drastic changes in the cost of lumber. On the plus side lumber costs are coming down. At the time I made this I spent approx $105 in materials.
Hi, what is the length, width, depth, height in cm please?
Hi you would have to do the conversion via Google using what’s provided.
Where can we get the plans please. I would like the dimensions of the cart.
Hello, we love the Cricut storage cart that you posted online. I have a couple clients that are asking about this, and wanted to know if you’re willing to sell the parts and we can build in our shop. Let us know, look forward to hearing back our email is [email protected]
Hi! I want to make this for Christmas, but I am not receiving the plans through email. Am I doing something wrong besides filling out the form?
I have tried to sign up and get the plans for this twice and I am not seeing an email or link of any kind. Can you please send me the plans? Or make them public if your no longer managing this blog. 🥺
I will send the plans over.