Tub Replacement: A DIY Dream or Nightmare?
It wasn’t until I came to the frustrating conclusion that due to the sheer volume of customers it would be weeks before I could get a mechanic to replace my winter tires, that I started to take a long hard look at all the different projects that I pay others to complete on my behalf – projects I’m certain I’m capable of completing on my own. Mind you, I don’t own the necessary equipment to swap out my all-season tires for my more responsive winter tires, but that hasn’t stopped me from thinking twice before picking up the phone and calling an automotive repair service. Don’t get me wrong, hiring a professional is usually the best way to go – they generally provide a quality guarantee and many can and do provide you with a long list of satisfied customers for you to contact. Sometimes though, you just can’t wait (or afford) to get a project done. I’ll be the first one to admit that like many homeowners, when it comes to something serious like a late-night plumbing emergency, I’m not one to take chances; a qualified plumber is the only way to go. But with all the resources available at our fingertips, both online and off, it only makes sense to roll up our sleeves and attempt to complete it ourselves. Best case scenario, you save some money – worst case, you learn what not to do next time.
While I would certainly encourage anyone to put on their DIY hat and give a home maintenance project a try, I’d have to caution that the more complex the project, the more research and planning you’ll need to do. When it comes to maintaining your home, it’s always better to learn to walk before learning to run.
Taking on a Bathtub Replacement: Know Where to Find Help
Unless you happen to be a professional plumber, as a DIY-er, you might steer clear of such a big project – but this is the information age. Search online and you’ll find endless forums offering up tips and cautionary tales provided by people just like you who were brave enough to take the project on. There are also countless tutorial videos that can take you through each step.
Important Considerations When Choosing a New Tub
Sometimes there’s more to a fixture replacement than simply removing the old unit and installing a new one. Before taking the plunge, determine whether or not installing a new tub will mean you’ll have to remove other bathroom fixtures in order to get the new tub installed. If it turns out that replacing your tub means that you’ll have to remove your toilet and vanity, it may be a bigger project than you might be prepared to take on.
Prepare a List of Tools You’ll Need to Get the Job Done
Before undertaking any home improvement project, make sure you have access to the tools that will allow you to see the project through to completion. If there’s something you don’t own, chances are good that you can rent them from your local hardware store.
Brass Tax: Getting the Job Done
- Take proper measurements. Before removing the old tub be sure to measure it, and the size of the bathroom door. In many homes, the original tub may have been installed before the door frame was installed. It’s important that before you start the removal process you know you’re going to be able to get the old tub out of that space.
- Make sure your new tub’s drain is on the same side as your old tub. Overlooking this tiny detail will at best, require a return trip to the store and at worst, causing you to rejigger a sizable amount of your washroom’s plumbing.
- Take the other bathroom fixtures into consideration. Will they need to be removed to get the job done? If so, consider enlisting the help of a friend to expedite the process.
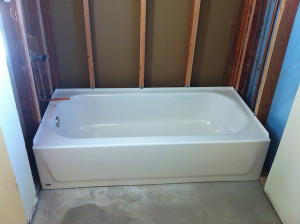
Remove the Old Tub
- Turn off the water supply. Locate your home’s water supply valve and close it. Then, open a facet on the level below your washroom to clear the line of water to avoid any leakage.
- Remove the faucets. Use a wrench to expose the piping and remove the cold and hot facets from the connections.
- Disconnect the drain. Using a wrench, disconnect the tub drain. Then, loosen the nut that connects the overflow pipe.
- Remove the spout and faucet. You may need to remove a portion of your wall to access these components. In most cases, you’ll likely only need to remove one row of tile to find them.
- Remove the pipes and pry the tub loose. Consider laying two by fours on the floor so that moving the old tub is easier.
Installing the New Tub
- Place the new tub in position. When the tub is in position, mark where the wall studs are.
- Mark the wall where the ledger is going to be. Typically, this will be approximately an inch below your previous marking.
- Using drywall screws, install the ledger board. At this stage, it’s important to make sure the ledger board is perfectly level.
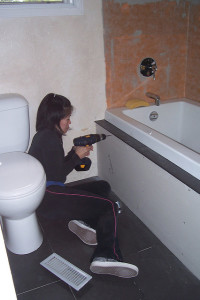
Photo Source: Andrew Hart - Install the shoe fitting on the underside of the tub. Dry fit all the connections.
- Assemble the overflow pipe and make sure that it will align with the tub openings.
- Apply plumber’s putty around the drain flange, then tape the flange’s threads. When finished, attach the flange to the shoe and tighten it.
- Attach the new drain and screw it into place.
- Following the manufacturer’s instructions, install the overflow cover.
Secure the Tub to the Wall
- Place a layer of mortar (approximately 2 inches thick) on the subfloor. This will secure the tub in place.
- Place the new tub on the subfloor. At this point, check to make sure that the tub’s position is level. If it isn’t, you can use wooden shims to make adjustments.
- Secure the flange to the studs using 1.25 inch nails.
- Connect the drain to the supply pipes. Fasten securely.
- Attach the faucets to the supply pipe fittings using joint compound while tightening.
- Screw the faucet handles into position.
- Turn on your water supply so that you can check for any leaks.
- If no leaks are found, repair and re-tile the wall around the tub.
Remember, a big part of completing any home improvement project is having the will to take it on in the first place. Having said that, probably the most important thing to remember is should it become apparent that you’ve bitten off more than you can chew, there’s no shame in calling one of your friendly neighborhood plumbers to lend you a helping hand.