How to Easily Repair Drywall Damage in Your Home
Drywall damage around your home could manifest as large holes, small holes, cracks, etc. Fortunately, these problems are inexpensive and easy to address. With the necessary home repair tools and some patience and perseverance, even novices can drive such imperfections away without having to seek out the skills of a general contractor. Today, our D.I.Y. home improvement tips are provided from Metropolitan Contractors.
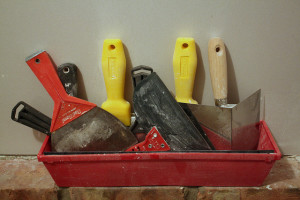
Tools and Materials
Before starting this home repair DIY project, the following tools and materials are essential. They should help escape frustration and save valuable time. These can all be purchased at a home improvement store like Lowes or Home Depot.
• Drywall sander or Drywall Sanding Sponge
• Screw gun
• Drywall saw
• Dust mask
• Utility knife
• Paintbrush
• Taping knife
• Drywall
• Drywall tape
• Joint compound
• Drywall screws
 Planning
Before heading to shop for the essentials, deeply analyze your purpose. Do you need tools to repaint the entire wall or for only touching up patched locations. For a small number of holes needing patchwork around replacement windows, a bit of touch-up paint and dab cloth should suffice.
Repairing Large Holes
- Prior to cutting the damaged spot out, look for obstructions in the wall such as a wire, duct or pipe. If there are hurdles, use a keyhole saw or drywall to carefully work around the area. Or use a utility knife to create a shallow cut.
- Cut backer boards close to 4 inches longer than the hole’s height. Soft wood, such as pine, would do great. When fastening them, hold boards tight to the drywall’s backside. Hold them carefully so that screw points don’t hurt you from the backside. The drywall screw would draw boards in tight. Ensure the screw heads are marginally recessed beneath the drywall surface.
- Measure drywall thickness and locate a big enough scrap material, usually found at home centers. Cut the scrap appropriately and screw it in with a 6-inch space between the screws. Taping the patch edges to deem it invisible is perhaps the trickiest aspect of the task.
- Purchase a paper tape roll and drywall compound. Mesh tape can be used, but it is not strong enough. If there are several repairs, purchase a twenty-minute setting compound sack. The compound quickly hardens and does not shrink; making it perfect for filling gaps and cracks prior to putting the joint tape on. Unlike standard joint compounds, the time spent filling the areas is considerably less. Moreover, the second coat can be applied on the first coat without having to wait for it to dry out. For a seamless output, also have flexible 10-inch and 6-inch taping knives.
- Apply tape and a compound coat to every joint. Thin out the compound slightly using a wet sponge to embed the tape.
- Take the 6-inch knife and smooth out the tape, pulling it out right from the center at both ends.
- Squeeze out a bit of compound from below the tape so that there’s no major wall hump.
- The subsequent coats are meant for blending and smoothing out the taped joints, which would make them invisible after painting.
- Once every coat dries out, have a straightedge set against the repaired wall to look for obvious bumps and dips. Use taping knife to knock off ridges and bumps. Add additional coats if necessary.
- Then get on with the sanding, priming and painting.
Repairing Small Holes
Small holes created by hooks or screws, drywall fasteners or wall fasteners are easy to fix, but are time-consuming as repainting the wall is inevitable. Nail pops tend to be common and quite irritating, because the chances of having quite a few around are high. However, drywall screws pop up as well at times due to damp framing, which dries and shrinks in the initial few years of a fresh construction.
- First, you must drive the nails back down with a nail set. If there are screws around, use a utility knife for digging the drywall compound at their heads. Use a screwdriver to turn them tight.
- Later, make a slight concave hole using a hammer for indenting raised edges. But make sure the drywall core isn’t crushed. Also, cut away paper tears using a utility knife. This technique works well with old fasteners too. Usually, tapping them slightly into the wall is much easier compared to pulling them out.
- Two drywall compound coats, applied with a couple of “plus” pattern knife swaps, must fill up the holes. The initial coat could shrink slightly, leaving behind a marginally smaller dent for the second coat to fill up.
- Scrape the surrounding wall excess so that a hump doesn’t build up.
- Lightly sand for a seamless blend with the neighboring wall. Make sure the spot is primed. Else, the topcoat would get absorbed within the patch and render a unique appearance to the spot compared to surrounding paint. And when priming, use a roller for raising the surface texture and matching the adjoining wall.
It’s that simple folks! I hope this makes all your dry wall repairs just a little bit easier. Remember, take your time and the job will get done.
Article written by Kiryako Sharikas. Kiryako is an SEO, Analytics, and Content Creation enthusiast who enjoys learning about any industry that comes his way. He studied Marketing at VCU in Richmond VA and is currently work at Compare.com. He loves sharing what he’s learned and believes that anyone can learn how to do any task as long as you dedicate the necessary time. Happy Learning! Follow Kiryako in LinkedIn.’


Thank you for the help. There is a hole in the drywall in one of the rooms of my house and I finally decided I need to repair. It sounds more straight forward than I expected. I think I can blend the lines pretty well, as you suggested. However, how do I fix the wall texture after I am done?
Thank you so much! I was unsure if I would be able to finish it correctly. Now I’m going to give it a shot!