7 Things To Know When DIY-ing Roof Shingle Installation
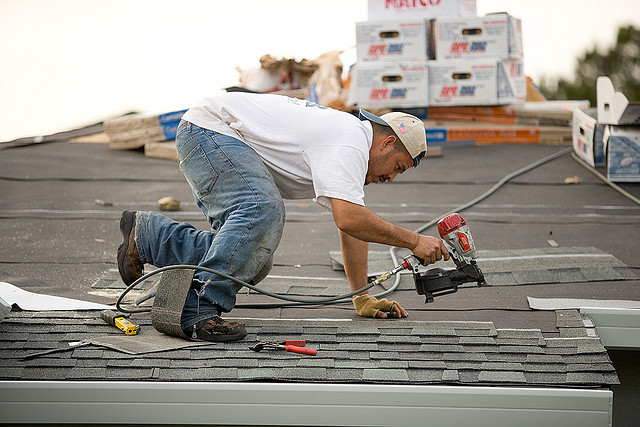
Applying shingles to your roof may appear to be a daunting task for those who are trying it out for the first time. It’s best to consult a roof expert who has spent many years, providing quality roofing shingle services to his customers so that you know you’re doing everything right the second time around. But if you really want to try your hand in doing this without the help of roofing services from the pros, here are some useful DIY tips to get you on the right track.
Safety First
Taking the right precautionary measures should be your top priority before embarking on DIY projects such as this. Make sure your ladder has the proper height and that it is correctly secured from top to bottom so there are no chances of falling. Never come in contact with power lines if you don’t want to end up in the headlines as the toasted handyman! Perform this only during good weather conditions and wear the kind of footwear that has good traction so slips can be prevented.
Materials
This is just an overview of what you’re going to need. Of course it may vary depending on the extent of your project and the vastness of the area you are going to cover.
- Ladder
- Hammer
- Safety rope
- Good traction shoes
- Work gloves
- Hand cleaner
- Cloth for cleaning up
- Tin snips
- Chalk line
- Apron
- Shingles
- Ridge shingles
- Aluminium or copper flashing material
- Level
- Roofing nails
- #90 mineral surface roofing
- #15 felt roofing
- Asphalt roofing cement
On Materials and Shingles Selection
Shingles are sold in retail which comes in squares. In order for you to know how many squares you are going to need, measure your roof’s square footage. Divide this by one hundred and you’ll have the number of shingles to buy, although it’s best if you have some extra for back up. You could also find various roofing nails from your local hardware or home improvement outlets that will suit the kind of shingle you have at home. If you’re doing this for brand new roofs, 1.5 inch nails are required, while 1.75 inch nails are used for repairs. Roofing felt cement is also needed.
Ask your sales representative at the store to help you select the kind of shingle that needs to be purchased because this will depend on your zoning codes, its intended use, even the climate where you’re located.
The Planning Stage
It’s okay if you want to have three layers of roofing materials set up but if you need to have more than that, you must first take out the existing material before applying new one. Any minor or major repairs must also be done including the handling of loose nails.
Removing Old and Damaged Shingles
Pull out the nails so the damage shingles can be removed. If these are covered, try using a knife to excise it. Replace the old with the new having the same design as the old ones and bond it to the roof with nails and cement.
Shingling Roof Valleys
Shingling areas of the roof with angles can be tricky that’s why you need to be careful to prevent leaks. Apply the roll roofing material to the valleys and add the 18 inch metal flashing down to the middle of your valley. Only secure it to the edges on the exterior then add cement. Then apply the 36 inch roofing material on top of the original strip.
You can now make the dual chalk lines and they should start from the ridge having a six inch initial spacing which is extended outward from each other than the spacing will increase to 1/8inch per foot that the lines extend. You can now lay your shingles along the chalk lines but they must not be closer than 1/2 foot to these lines.
For those using asphalt shingles, you’ll need 5/8inch plywood sheathing and 15 pound roof felt. The length of the felt must overlap each other by 2inches to prevent inclement weather from damaging it. Staple the felt to attach.
Starting and Adding Shingles
Start your chalk line in the roof’s center. Attach your starter strip. It must extend from the roof by half an inch at the roof’s lower tip. Put the first shingle over your starter strip in the chalk line then pound four nails into every shingle.
For adding more shingles you need to check on manufacturer’s instructions to know where to start the chalk line to add extra course of shingles and perform this until you finish at the end.
Lay the succeeding shingles one after the other according to instructions. Add the third course starting at the center and repeat until entire roof is completed.
So you see, it’s not as hard as you think right? You may or may not seek help from professional roofing services if you feel you’re bold enough to do this. But for those who want to be absolutely sure they get the job done right the first time, it’s best to consult seasoned roofing shingle services in your area.
This article was written by Vasilie K. Vasilie is a home design and home improvement contractor in Massachusetts. She is the owner of Major Home Improvements and she believes every home owner deserves the best services they could afford. Visit their website for more details! Also find her on Twitter and Google+.